How to Use Mint To Create and Follow a Budget
Preface: There are three basic tools to design a budget and to track spending. You can use an Excel spreadsheet, a free online app like Mint, or one you purchase like YouNeedaBudget.com, also known as YNAB. Many people ask me should if they should use Mint for free or YNAB for a one-time fee? It’s preference, consider that Mint is free, but they sell your information to Big Data firms and for marketing you things. YNAB on the other hand is private. Both offer downloads from your financial institution and have mobile applications. In this article I will describe how to use Mint, and in a later article I will teach you how to use YNAB.
Step 1: Cash Flow Plan – Design a Budget
Designing a budget before signing up to Mint is the first thing you need to do. If you sign up for Mint, like over 50% of people, you will not use it. That is because you didn’t first design a balanced budget. This means you have to account for almost every dollar and expense in an organized manner first. After you have done this then you are ready to create and modify a new account at Mint. To make this as easy as possible I’ve created an Excel spread sheet for you, it mirrors exactly the flow of Mint. I call it the Mint Designer, so download it, and design your budget before doing anything else. Then follow these next steps to do two things, first it will familiarize yourself how Mint is set up, and secondly to learn how to set yours up.
Step 2: Sign up for Mint (see image below)
- Go to Mint.com and register for a new account
- Use a desk top/laptop computer since a phone screen may be too small
- If you have an old Mint account, that you have not used for quite some time, delete it and then in 24 – 48 hours create a new one
- Add all bank accounts that you use for spending to the app
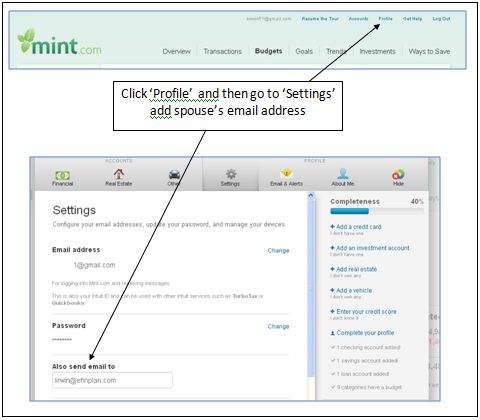
- If you’re married and your doing this together and share accounts, add your spouse’s email to the settings, this way, both will be notified when spending goes over budget
Step 3: Familiarize yourself with Mint’s Budget section
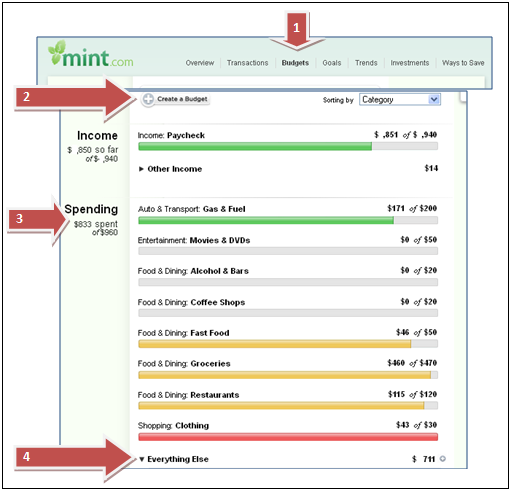
- Select ‘Budget’ at the top of the page (#1)
- Find the ‘Create a Budget’, but don’t click it yet (#2)
- Find Spending section (#3)
- Find and click the Everything else section, this is where Mint puts expenses that don’t have a ‘Budget’ yet (#4)
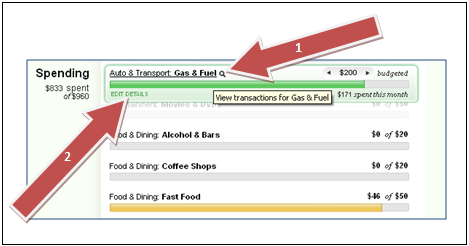
Step 4: Familiarize yourself with Spending section of Mint
- Each section has a Category and Sub-category: in this example ‘Auto & Transport’ is the main category, and ‘Gas & Fuel’ is the subcategory
- When you highlight a category, you will now see a little magnifying glass (#1) and a green ‘EDIT DETAILS’ (#2)
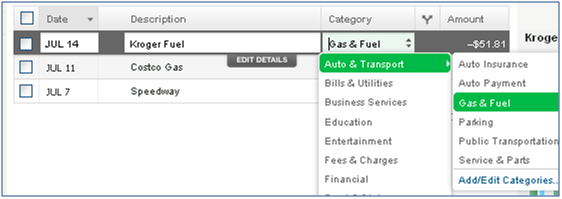
Step 5: Familiarize yourself with the Transactions section (magnifying glass) within a category
- This takes you to a list of all transactions (below) in a month for that category and subcategory (#1 arrow above), this is where you change/move an expense to the correct category
- You can even split between categories (Y)
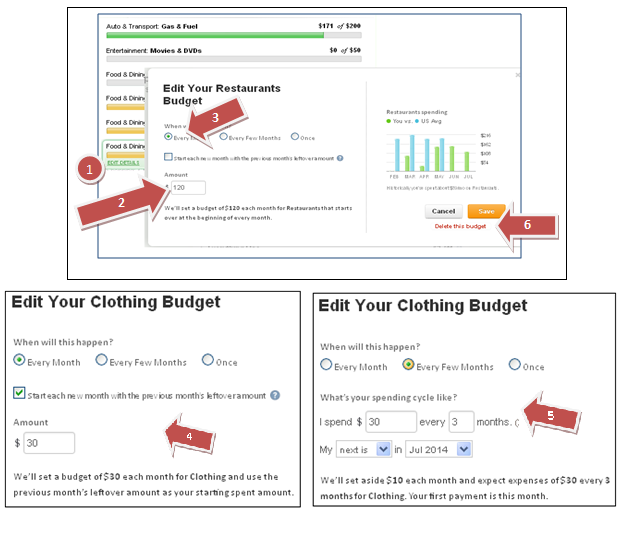
Step 6: Familiarize yourself with ‘Edit Details’ of listed budget items
- Click the little green ‘Edit Details’ (#1)
- Enter the dollar amount for this expense number (#2)
- If the expenses is every month, check the first ‘Every Month’ (#3)
- If you want the expense to be cumulative, meaning some months you may have $0 expense, this will be an average (#4)
- If the expense is something like quarterly, select ‘Every few Months’ (#5)
- If you want to Delete the expense (#6), which starting out you might do for all categories if you want to have a clean page to start from scratch
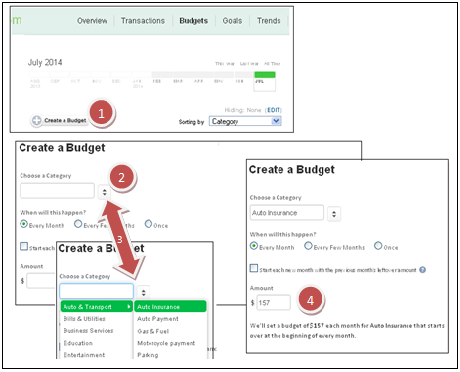
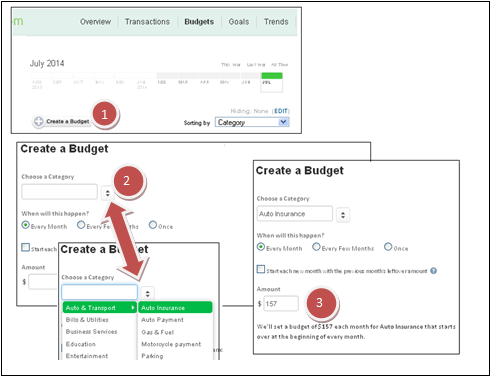
Step 7: Familiarize yourself with the “Create a Budget’ section
- Select ‘Create a Budget’ (#1)
- Choose a Category with the up/down next to the blank (#2)
- A list of Categories and Sub-categories will come up, select one (#3)
- Complete the amount of the budget and click Save (#4)
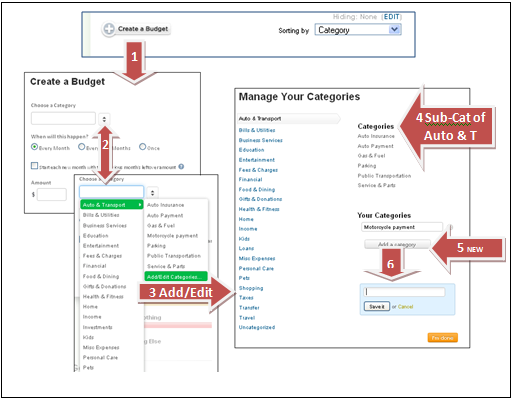
Step 8: Familiarize yourself with the “Add or Edit (sub) Categories’
- Select ’Create a Budget’ (#1)
- ‘Choose a Category’ with the up/down next to the blank (#2)
- A list of Categories and Sub-categories will come up, select the Main Category that you want the new Sub-Category to appear
- List of Sub-Categories appears already, if you don’t see one you want like a Motorcycle Payment, go to next step
- Click ‘Add/Edit Categories’ (#3), then ‘Manage your Categories’ comes up (#4), click ‘Add a Category’ (#5) , type ‘Motorcycle Payment’ or something from your budget (#6), click ‘Save it’. The list of your custom categories will appear under ‘Your Categories’
Step 9: Change the current budget: you are now familiar with the Mint’s set up, you will now input your new budget you will be following
- Gather your Mint designer budget spread sheet
- Login to Mint.com
- Compare your Mint designer budget to the budget items Mint already created for you, change the monthly amount to the amount in your new budget, by clicking the green ‘Edit Details’ (#1)
- If the expense is the same each month, you are done, click ‘Save’
- If the expense is every now and then see #3 and #4, if it is something like quarterly, see #5

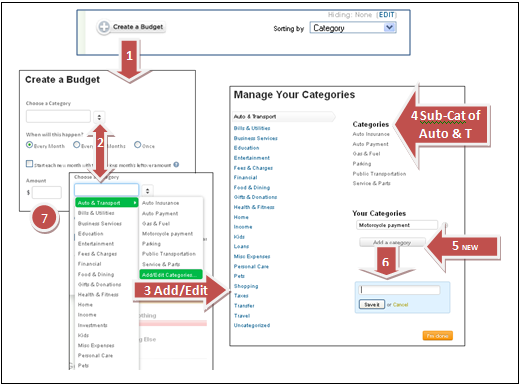
Step 10: Add New Budget Items
- Click (#1) ‘Create a Budget’ the ‘Create a Budget’ screen will come up, select from the list of Categories AND Sub-categories that will come up (#2), select the one (#2) that you have in your Mint designer
- Enter the correct dollar amount (#3)
- If you don’t see the Subcategory that you want, go to the next page step
Step 11: Create New Custom Sub-categories
- Select create a budget (#1)
- Choose a Category with the up/down (#2) that you want the Subcategory to be in
- Click the little green, ‘Add/Edit Categories (#3)
- Click ‘Add a category’ (#5) blue box appears, type ‘Motorcycle Payment’ or something from your budget (#6), click ‘Save it,’ the list of your custom categories will appear under ‘Your Categories’
- Enter the dollar amount for that new budget item (#7)
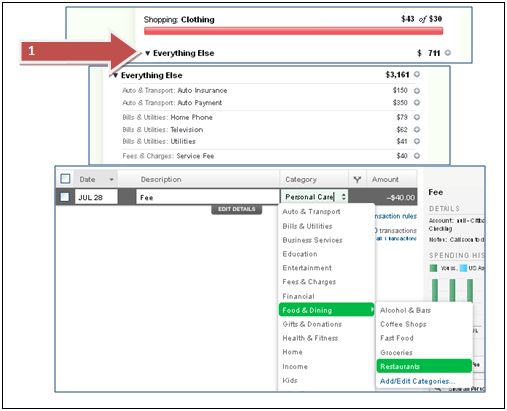
Step 12: Clean Up unassigned expenses
- Go the bottom of your ‘Budget’
- Click ‘Everything Else’ (#1)
- This is a list of every expense that your bank has imported, but doesn’t have a Category assigned to this expense, this is because Mint didn’t intuitively know where to put it –or– you didn’t include this expense in your original Mint designer or ‘Create a Budget’
- Click one of the categories, such as ‘Fees & Charges’
- Assign that expense to the appropriate ‘Budget’ category IF you already have a budget for that item, if you don’t go back to ‘Create a Budget’ and create one. Then go back to everything else and choose the Category for the new budget amount. If it was cash (ATM) choose the correct category for it.
Summary: Key to any financial plan, whether just starting out, or retiring tomorrow is to have a cash flow plan and a way to track spending so that you stay within your spending limits. Your action plan is to design a budget and track spending. Next, if you don’t have a financial plan to help you track everything else, sign up for eFinPLAN.com, it’s an easy to use, comprehensive approach to reaching your financial goals.